
5 Types of Watercolor Charts - Type 4: Color Mixing Chart
This post is part of a series going over 5 types of watercolor charts. If you're just jumping into this series, you can check out the rest of color chart posts here!
Color Mixing Charts
I think of color mixing charts as a combination of the basic color chart and a color wheel. You’re taking the paints in your palette (or a selection of them) and mixing them with each other to see what colors they make.
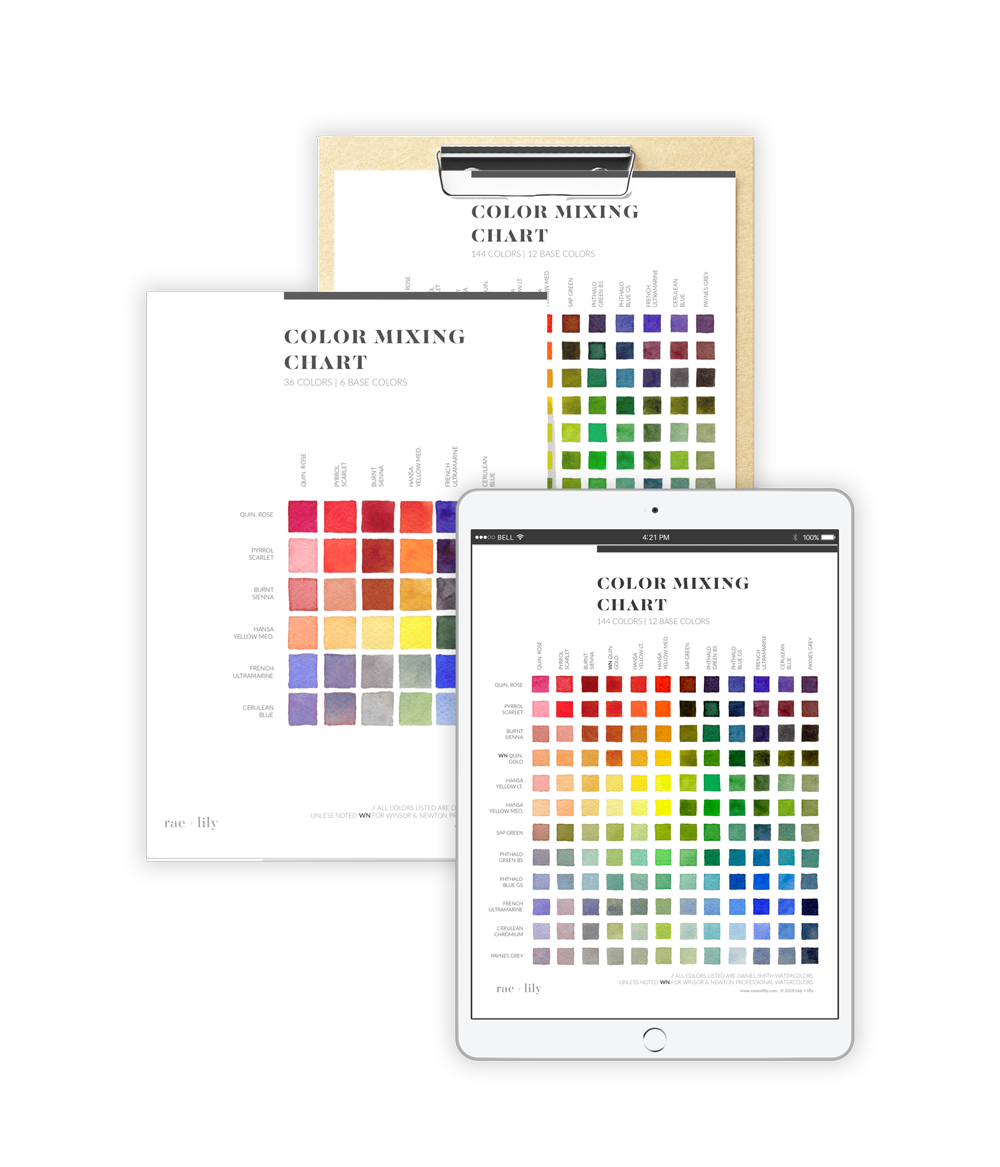
This is when you really witness the magic that is color mixing. With 6 colors, you can make 36 colors. With 12 colors you can make 144 colors. (In fact, you can actually mix MANY more than shown on the color chart, but we’ll take a look at how in the last part of the series.)
What I love most about these color mixing charts is having an organized sheet with a snap shot of colors your palette is capable of producing.
Believe me, it will come in handy when you are figuring out if you have the paints to mix up a particular color! While there are a lot of paints out there you can buy for your convenience, there are just certain colors that I think you can only get by mixing up yourself. Like a beautiful light sea-green or soft lavender.
Now, let’s go through how I like to draw and paint these color mixing charts. I’ve painted quite a few and tested some different ways of drawing them out while making lots of mistakes along the way, so read on to check them out!
Supplies Needed:
Besides the obvious paints, paper and a brush, you'll need a few other materials to make your charts. I'll list all of them below with a few recommendations:
Just a note: Below I use affiliate links share only tools I actually use that I think you might find useful. If you click through and purchase, I earn a small commission with no extra cost to you.
watercolor paints
watercolor paper (140lb/300 gsm)
watercolor brush (size 6 or 8)
ruler (I have one like this, from Michaels)
pencil 2B (or waterproof pen if you prefer)
plastic eraser (like this - just in case)
water
paper towels

FREE COLOR CHARTS
Enter your email to download a copy of my 6-color and 12-color color mixing charts that you can use for your own reference.
How to paint a color mixing chart
UPDATE 10/2019: Since writing this blog post, I’ve discovered and tested another way of creating grids for these color mixing charts. If you are following along with how to draw up your grid, the information below will help you with dimensions and layout. However, you might want to look into using masking tape to mask off the grid once you have it penciled in!
Check out this video to see what masking tape to use and how it can save you some time and make painting the chart easier!
Drawing up your Grid
The quick way
You can draw up one of these really quickly by following these steps:
Count the number of colors you want to mix for your chart, for example: 6
Using our example of 6 colors, use your pencil and ruler to draw a 6x6 grid of 36 squares. I recommend your grid spacing be at least 1/2”x1/2” otherwise you won’t have a lot of surface area for color.
Tip when painting: Make sure not to paint all the way to the edge of the grids unless you are allowing the paint to completely dry before moving on to the adjacent squares. I like to leave a gap between grids to keep the colors separated (example photo shown later on in the post)
That’s it you can move onto the “Painting your chart” section
The less-quick, but better looking way (in my humble opinion!)
This is the way I like drawing up my grids, believe me - it will result in a nicer looking chart and you’ll want that because you’ll be keeping this around for a while!

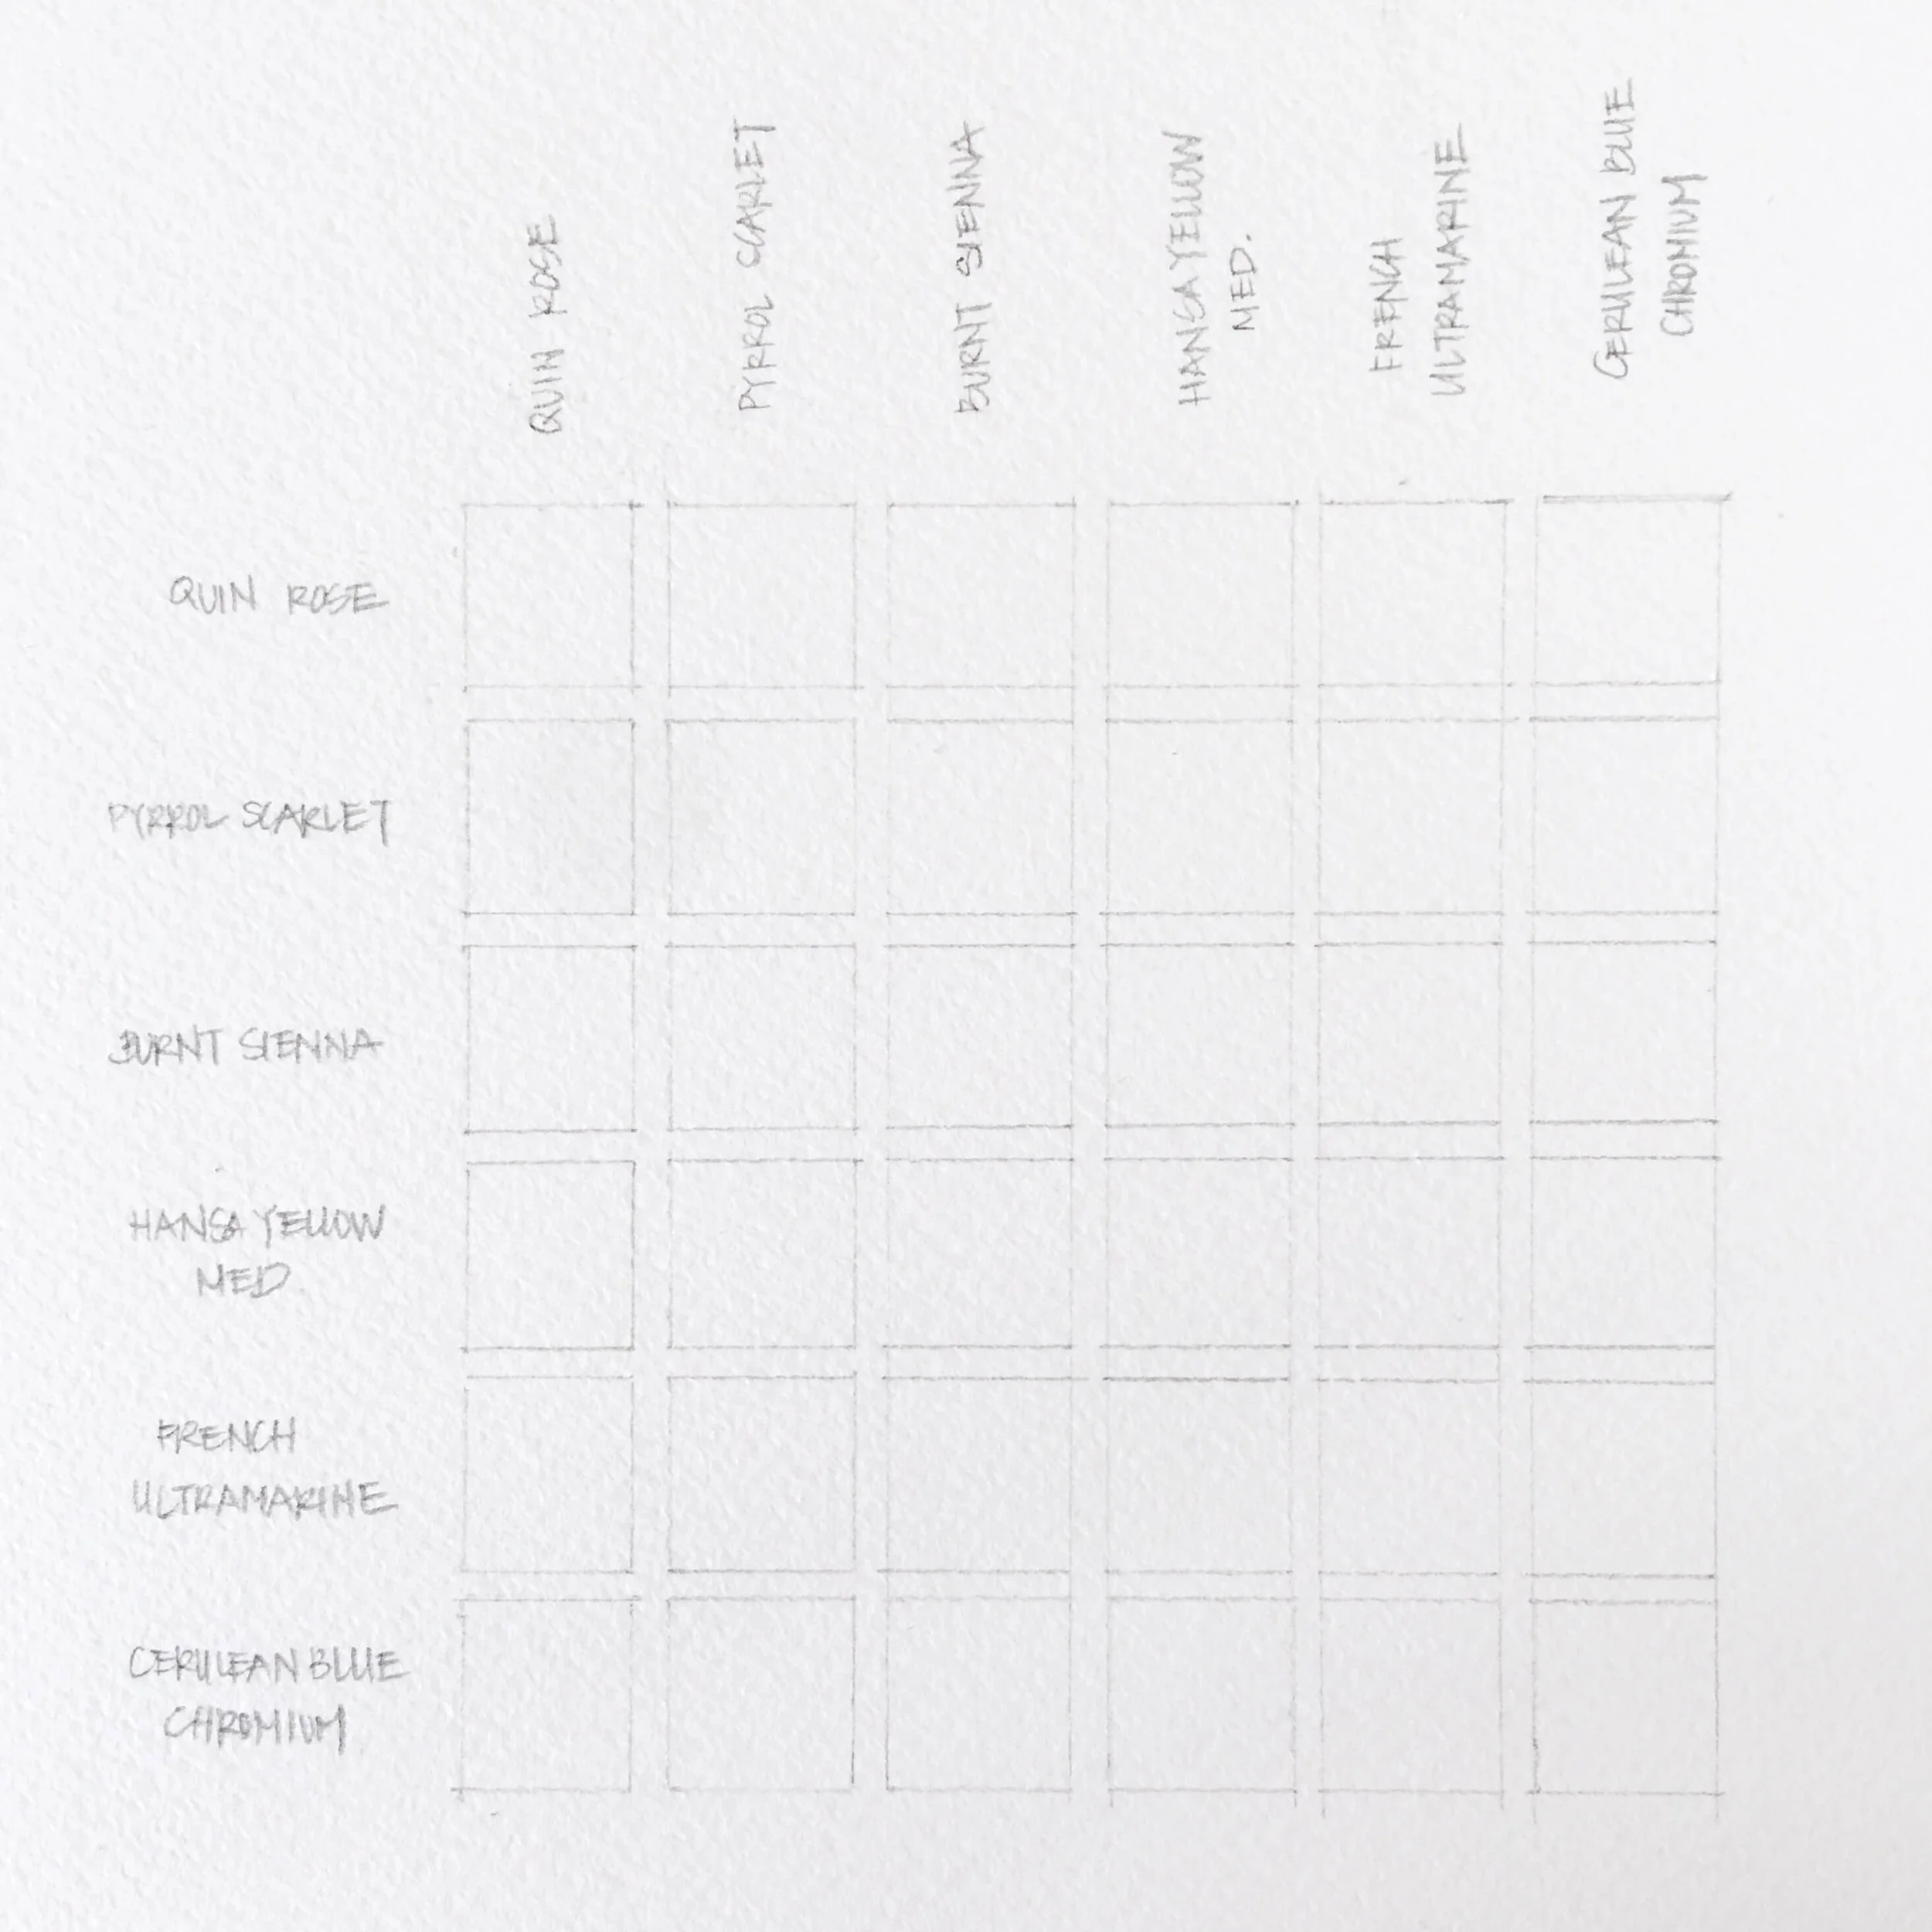
Count the number of colors you want to mix for your chart, for example: 6
Using our example of 6 colors, use your pencil and ruler to draw a 6x6 grid of boxes. What you are aiming for is to have a separation between each of your 36 squares.
I like to draw my squares at either 1/2”x1/2” or 5/8”x5/8” with a 1/4” or 1/8” gap.
That’s it! It will take a little longer to draw, but I definitely like the look of this chart better.
PAINTING YOUR MIXING CHART
Now, before you start painting, I would like to suggest that this part is best done while listening to your favorite podcast, music or binge watching Netflix. That's MY kind of night!
Note that this will take some time - especially if you’re going for the 12 color mixing chart with 144 squares to fill. To give you an idea of how long it took me, for the larger 144 color chart, I painted it over the course of 3 days in hour long sessions. Granted I was watching TV and probably moving a bit slower.
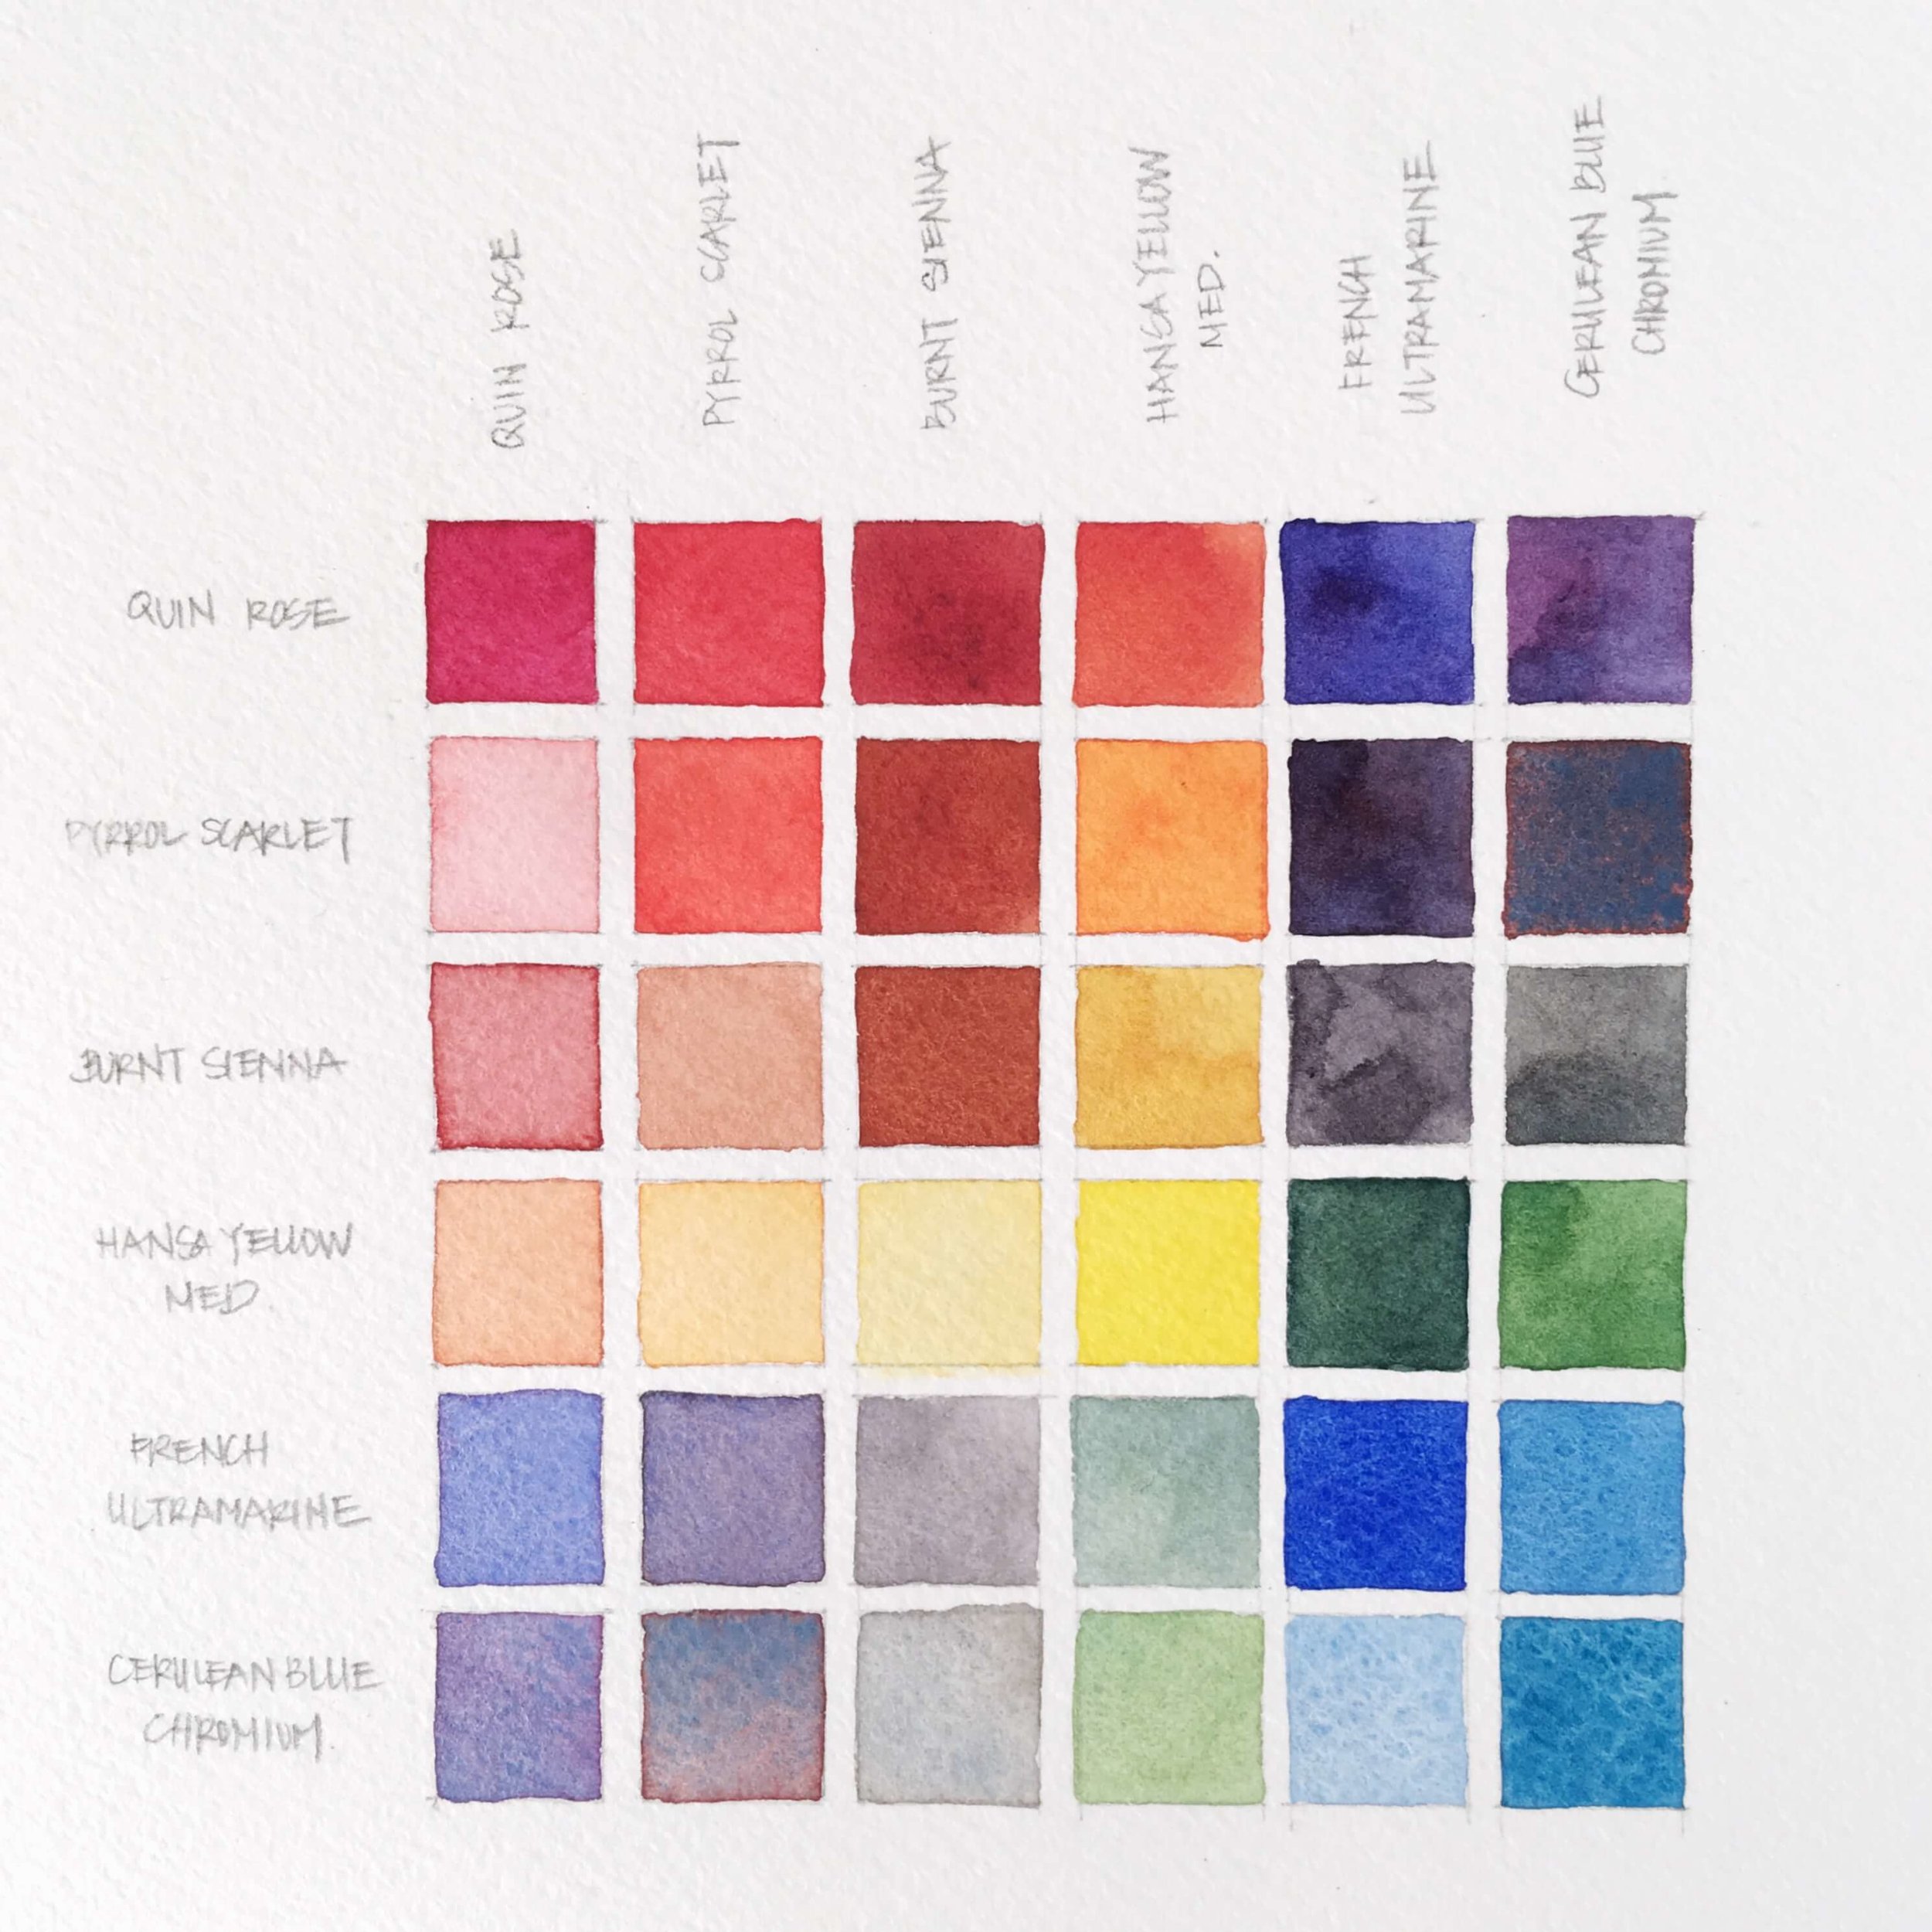
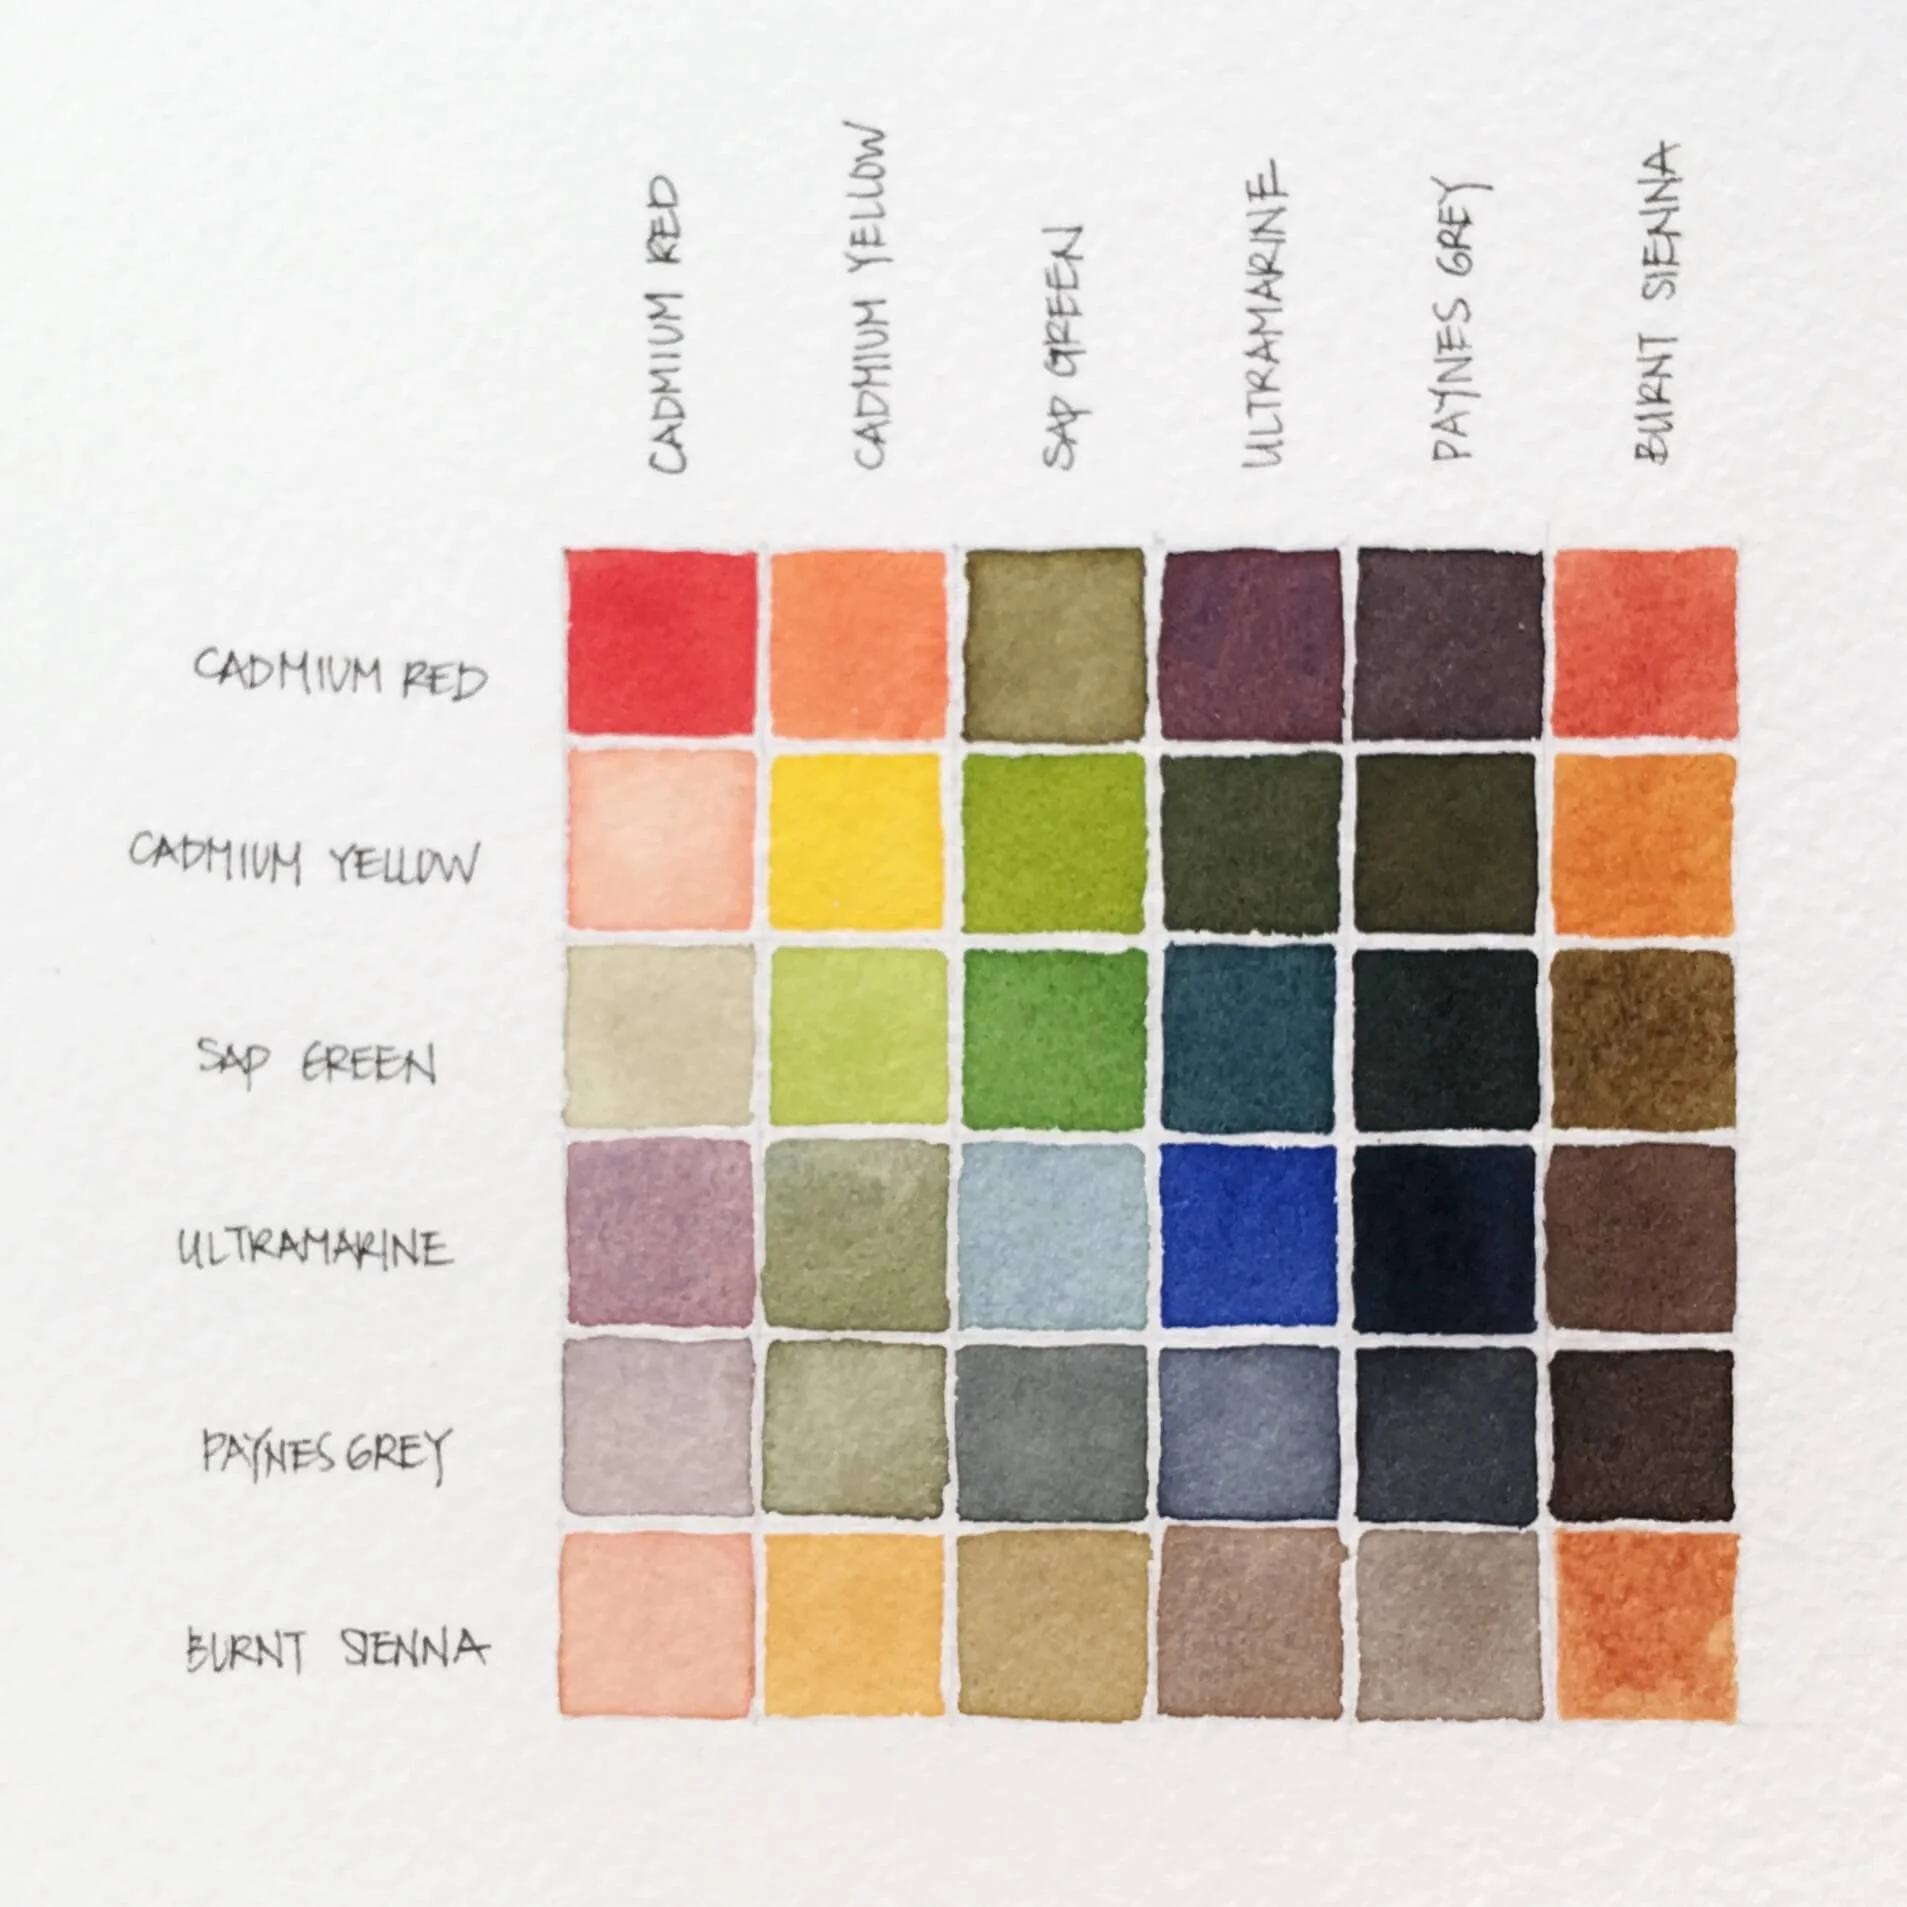
Pre-plan the order of your colors. For the most visually appealing color chart, I suggest you arrange your colors roughly in order of the rainbow spectrum.
In general, the order I usually follow is:Pinks
Reds
Reddish/Earth Colors (like Burnt Sienna)
Oranges
Yellows
Greens
Blues
Purples
Neutrals (like Paynes Grey)
Dark Earth Colors (like Raw Umber)
Note: If you don’t have that color family in your chart, just skip over it and line up the next color in the list.
In order from left to right, write the colors across the X axis above your chart.
In order from from top to bottom, write the colors down the Y axis next to your chart.
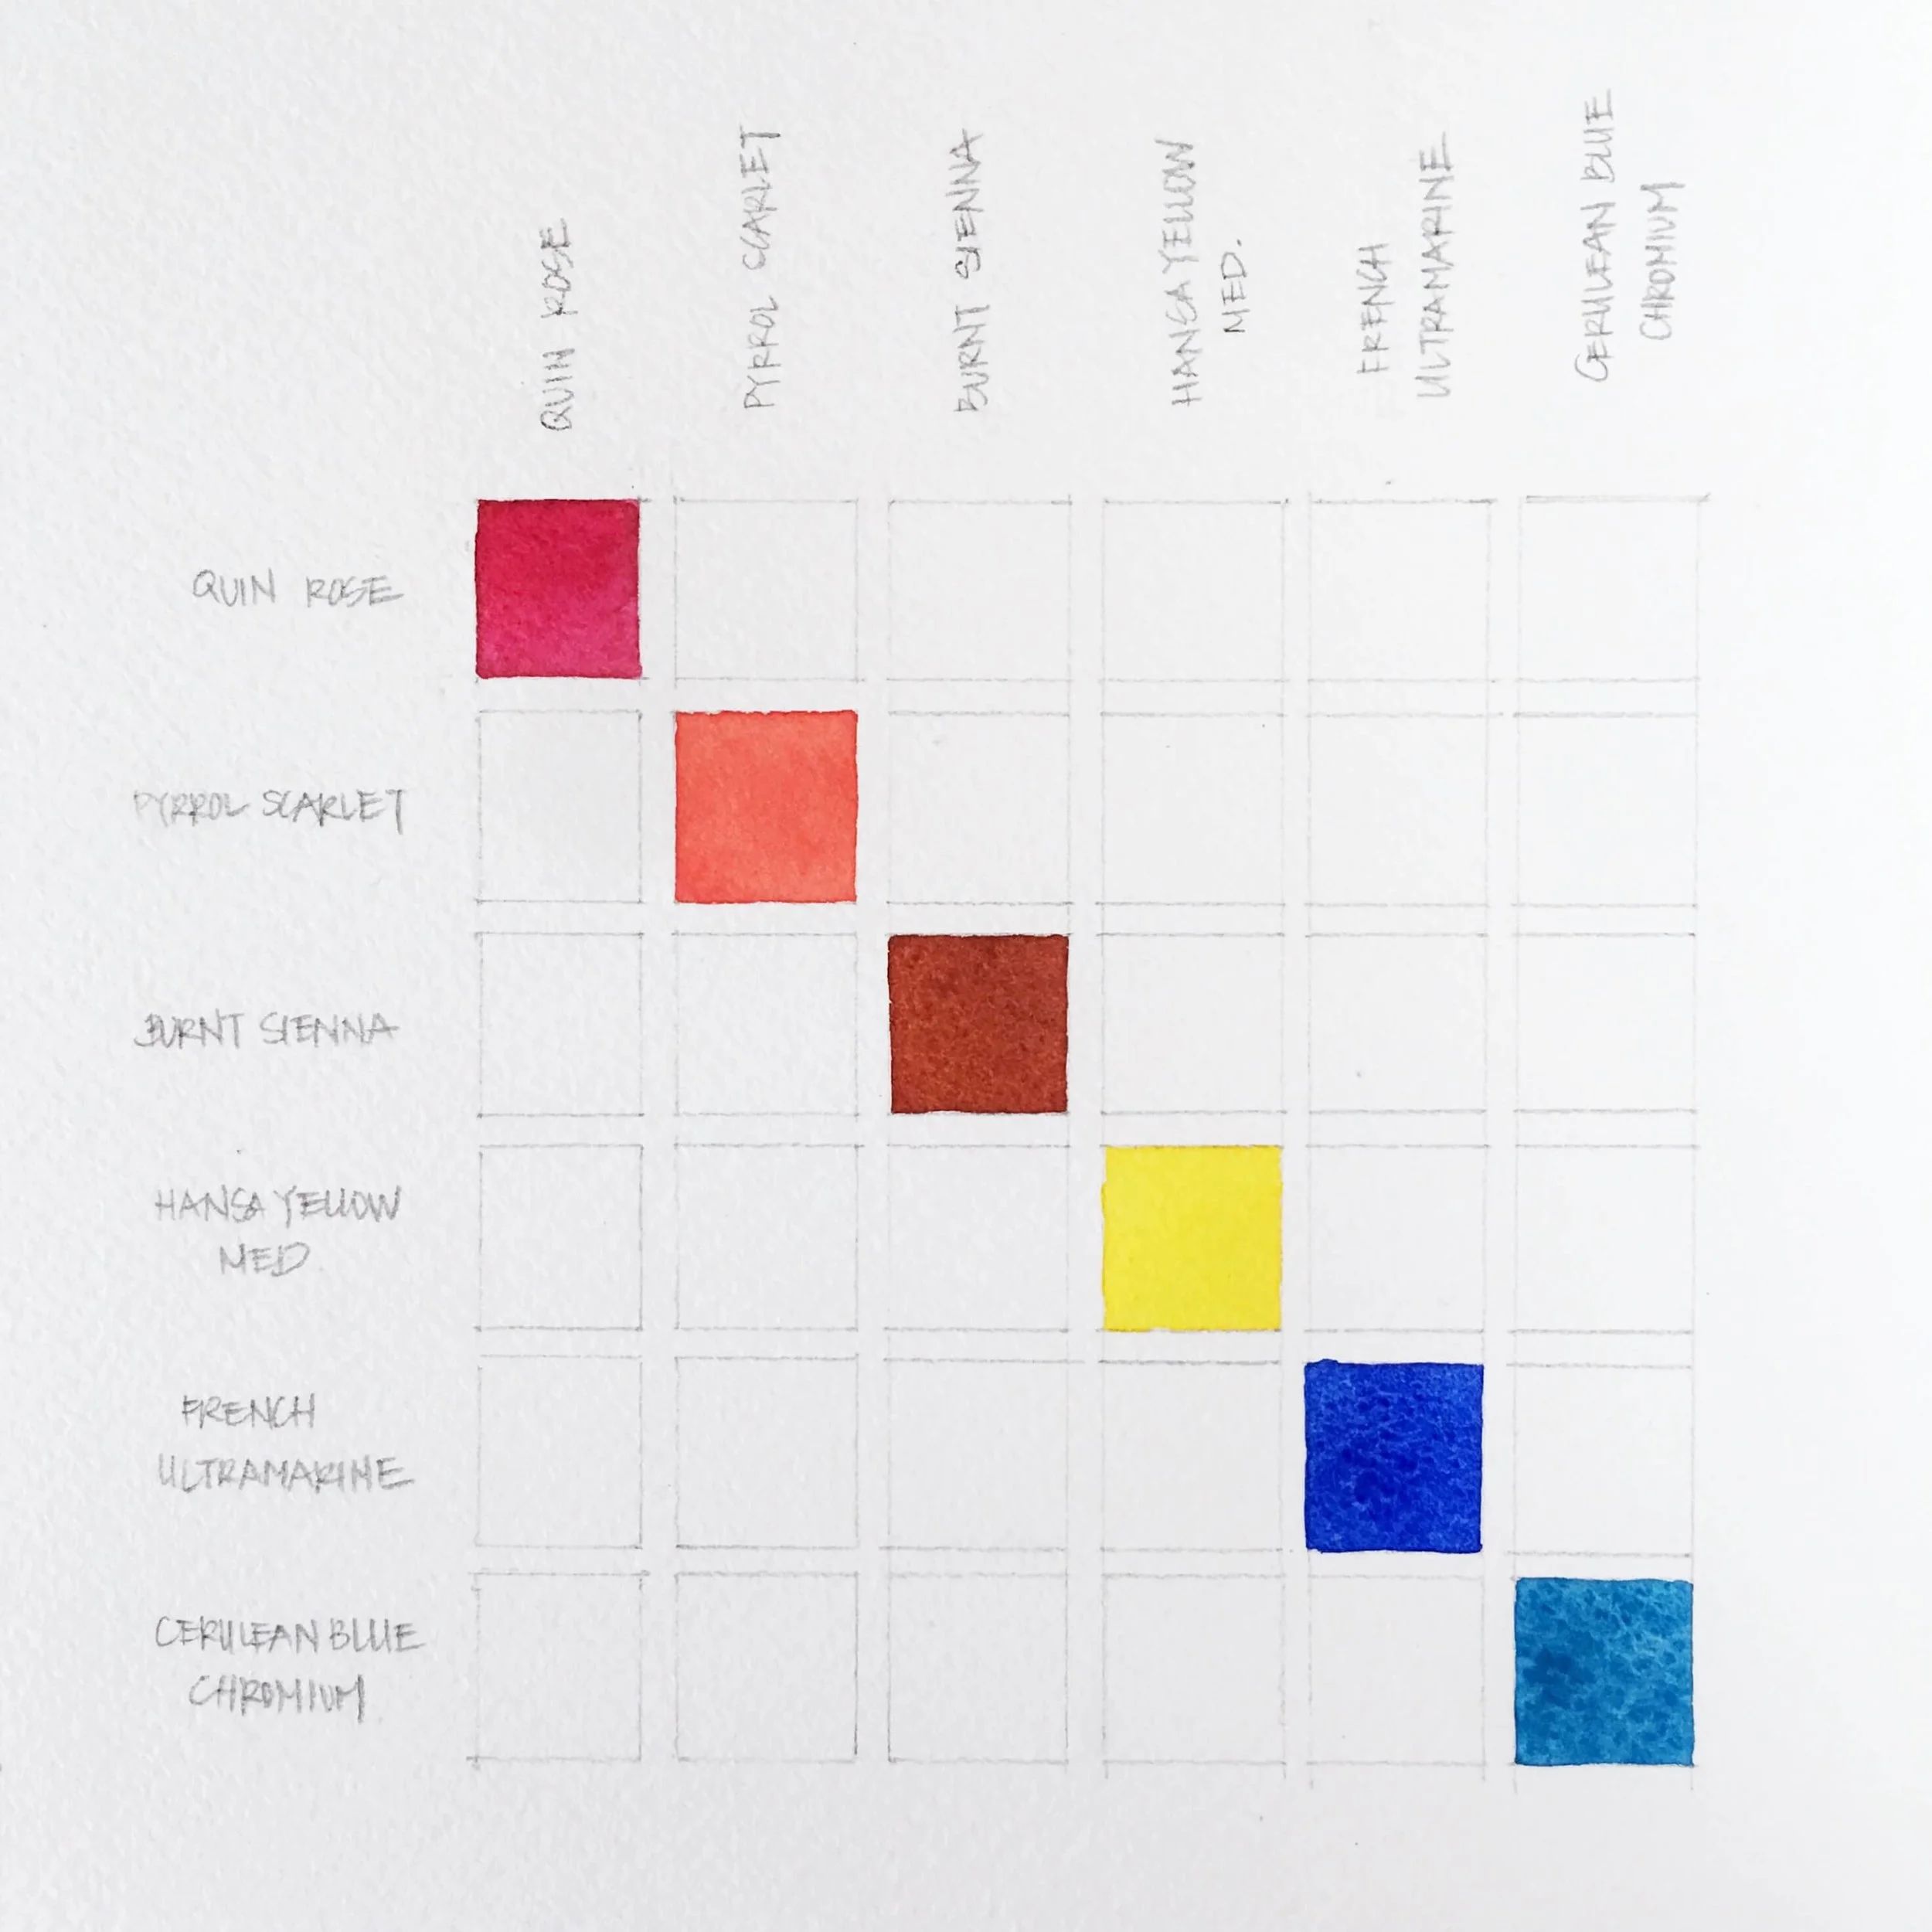
Next, starting from top left to bottom right, in a diagonal line, paint the pure swatches of each color as it is labeled on the axes. In other words, follow each color down from the x-axis and across from the y-axis to find where they intersect to paint the color swatch in it’s designated box.
If you are using the quick grid (no separation between boxes) be careful to keep the paint colors separated. If you allow the wet paint to touch between the boxes your color mixing chart will have inaccurate color references!I like to return back to the top left, and start working on the first column and first row. If you look at the way the grid works, color in the top left corner will be mixed with each of the other colors in order to fill in the row both across and also down.
Repeat mixing colors for each row and column for the entire grid.
Labeled Chart
I've made the mistake of not labeling and then getting myself confused!
Diagonal Base Colors
First step: Painting all of your base colors that run diagonally down your chart.
WAIT, WHY AM I PAINTING THE SAME COLOR TWICE?
I’m sure you noticed that we would be painting duplicate colors both across and down the grid for every color - which seems useless, doesn’t it? You could if you wanted to, but there are two other options:
Option 1: Paint only half of the chart (here is an example I found).
But note that you won't have as many colors in our chart this way. For a 6 color mixing chart, we would end up only 21 colors instead of 36.
Option 2: Paint the a lighter value of the color across the diagonal.
For a 6 color mixing chart, this is how we'll get the full 36 set of colors.
TAKING OPTION 2? HERE'S SOME TIPS:
The most efficient way I’ve found to do this is by first counting the number of empty squares in the row I’m working on. Then I pre-mix that same number of puddles in the base color for that row (for example 5 puddles of Quin Rose in the example below). Now, for each color mix, I just need to pick up the mixing color with my brush and go directly to the puddle on my palette to make my mixes.
For each mixed color, I paint the saturated swatch first and don’t wash my brush. Instead, I dip it in clean water, wipe it off on the edge of the container, and paint the corresponding lighter value swatch in the designated column.
There, we just saved ourselves having to mix the color up twice!

Painting the lighter value of Quin Rose + Hansa Yellow Med after painting the full value version first.
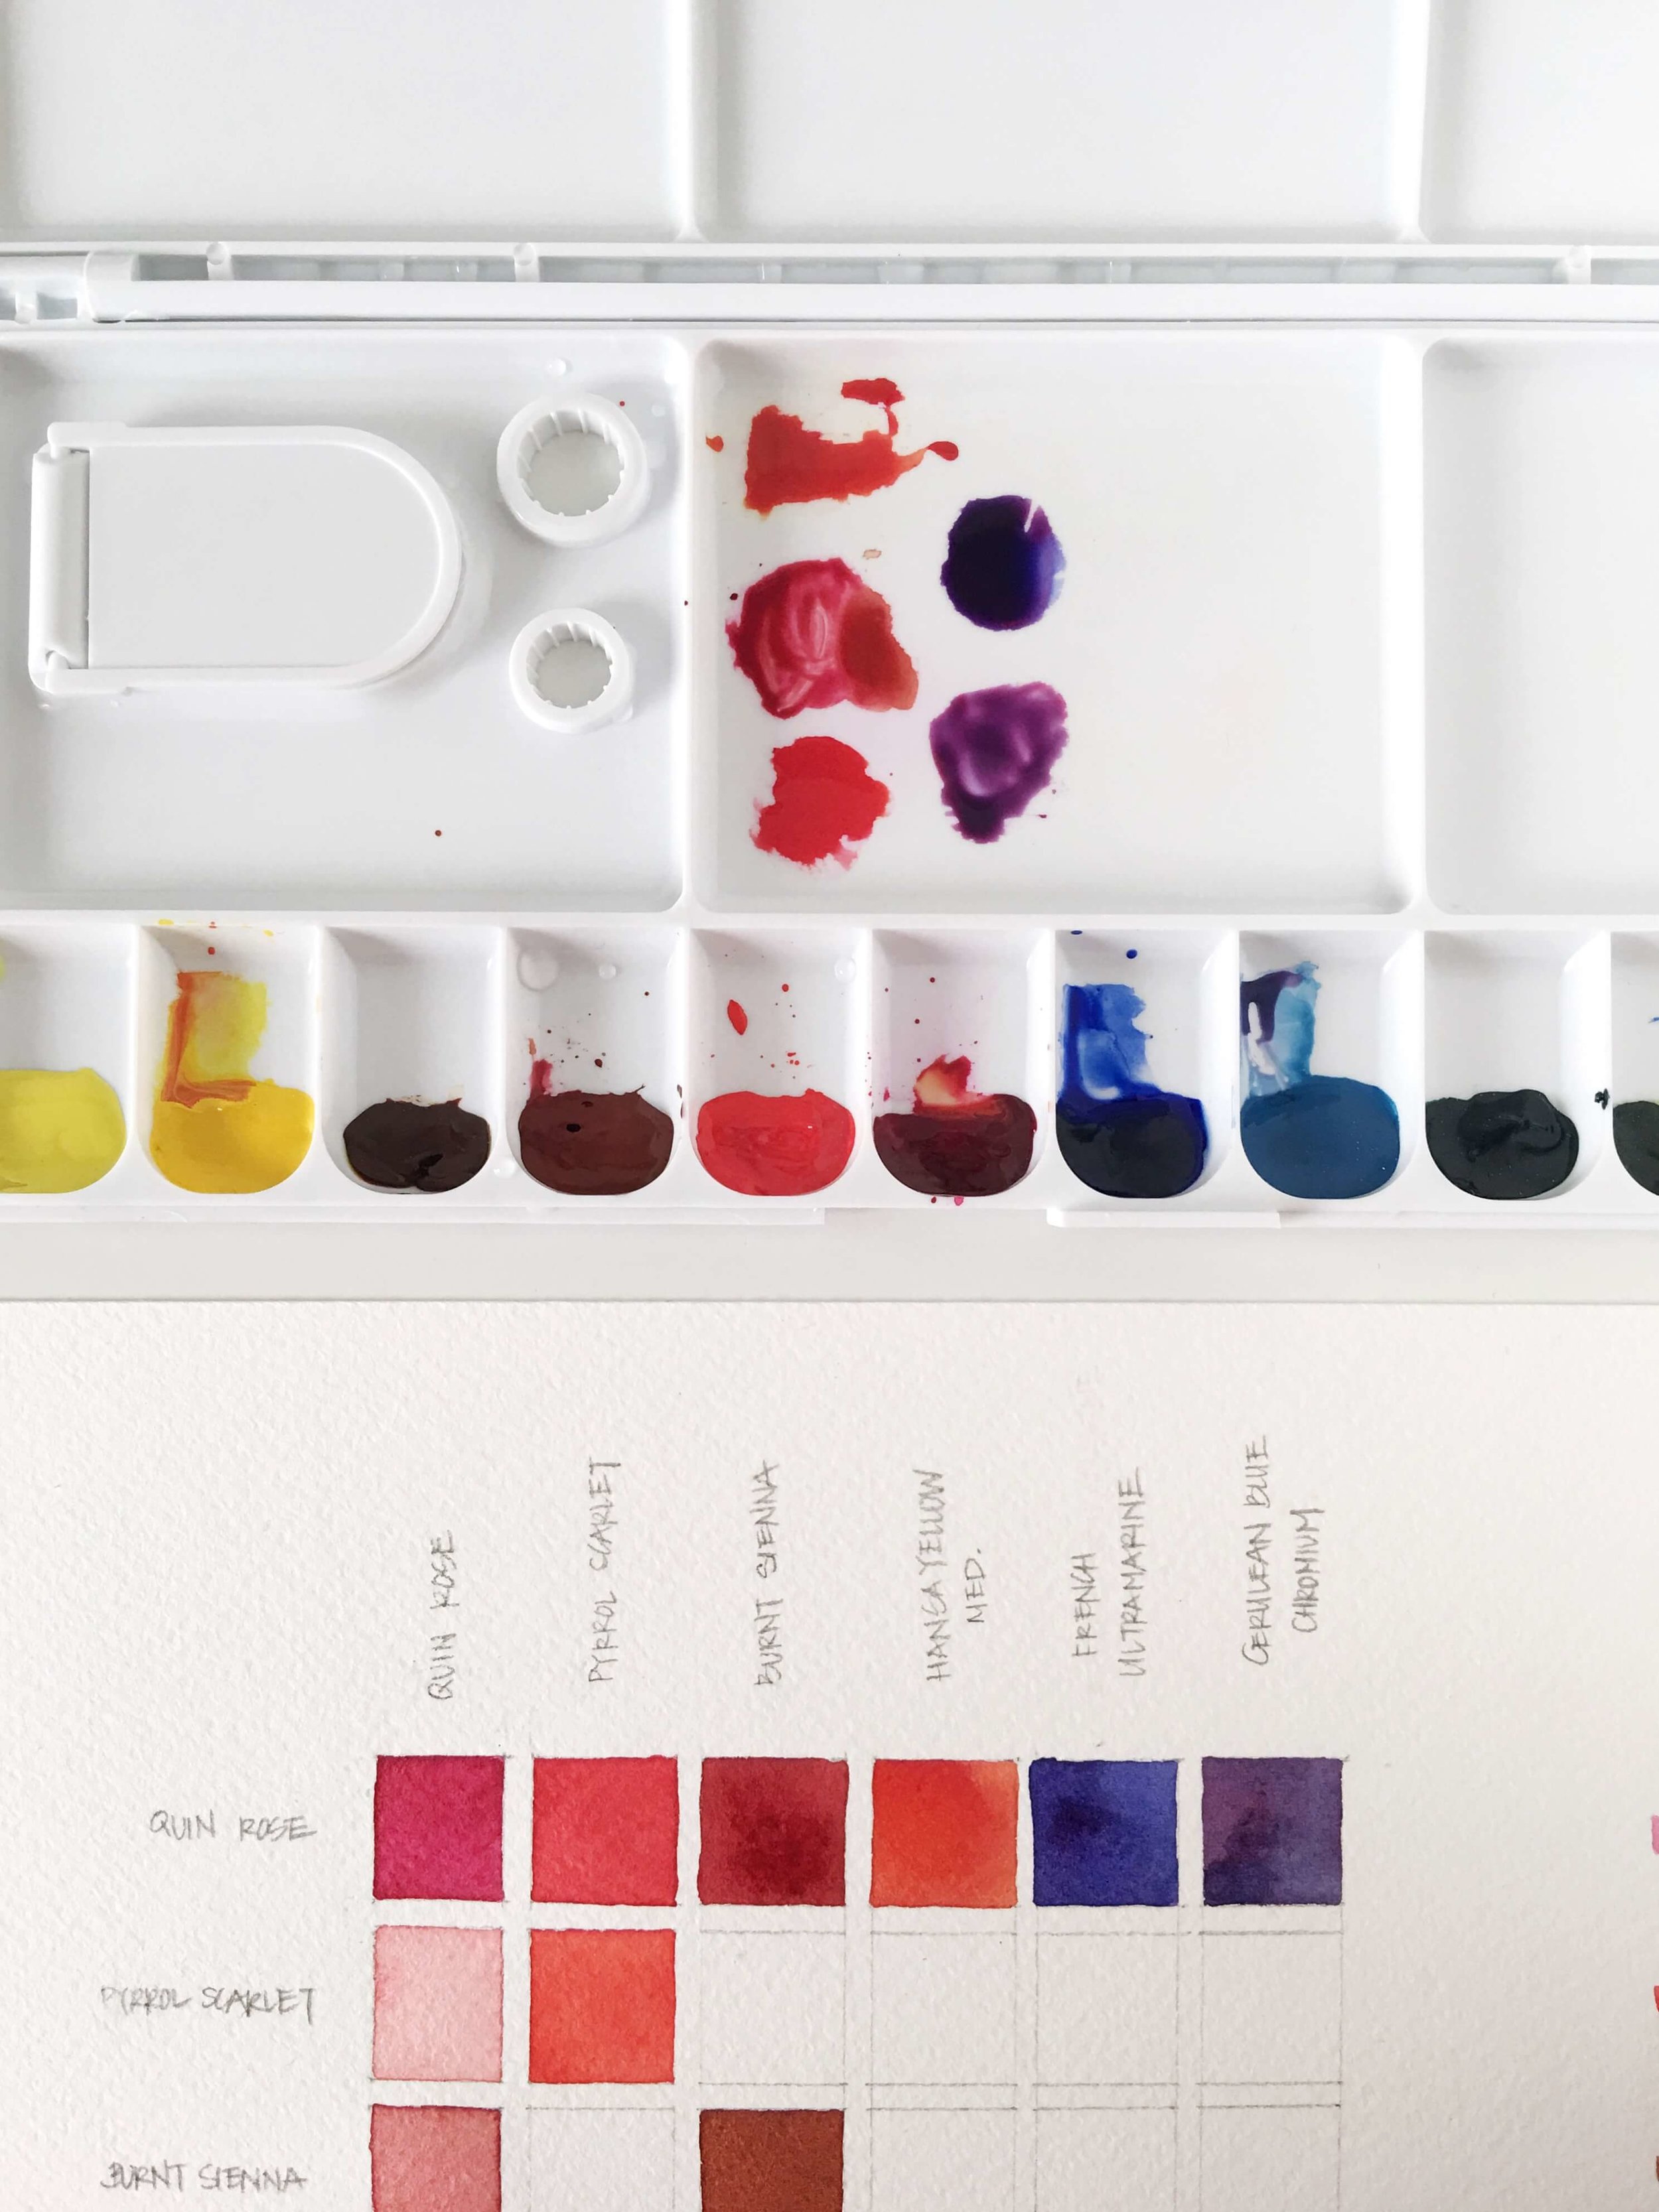
5 pre-made puddles make mixing up each color in the row more convenient.
Comparing Grid Types
Just so you can see the difference between the types of grids, see below for an example of a chart using the quick grid and one using the grid of boxes (my preferred). I like the look of having clean gaps between each of the colors, so even when using the quick grid, I purposely leave a clean gap between the colors. Obviously you can paint them anyway that works for you, it's about color mixing and not perfect squares. The way you lay it out has no effect on the value of the experience or it's usefulness as a reference guide later!
Grid using separated boxes with gaps.
My preferred!
Grid only (gap created intentionally while painting)
My 144 Color Mixing Chart
So I finally took the time to paint a 144-color mixing chart using my most-used colors and want to share them in a download with this blog post!
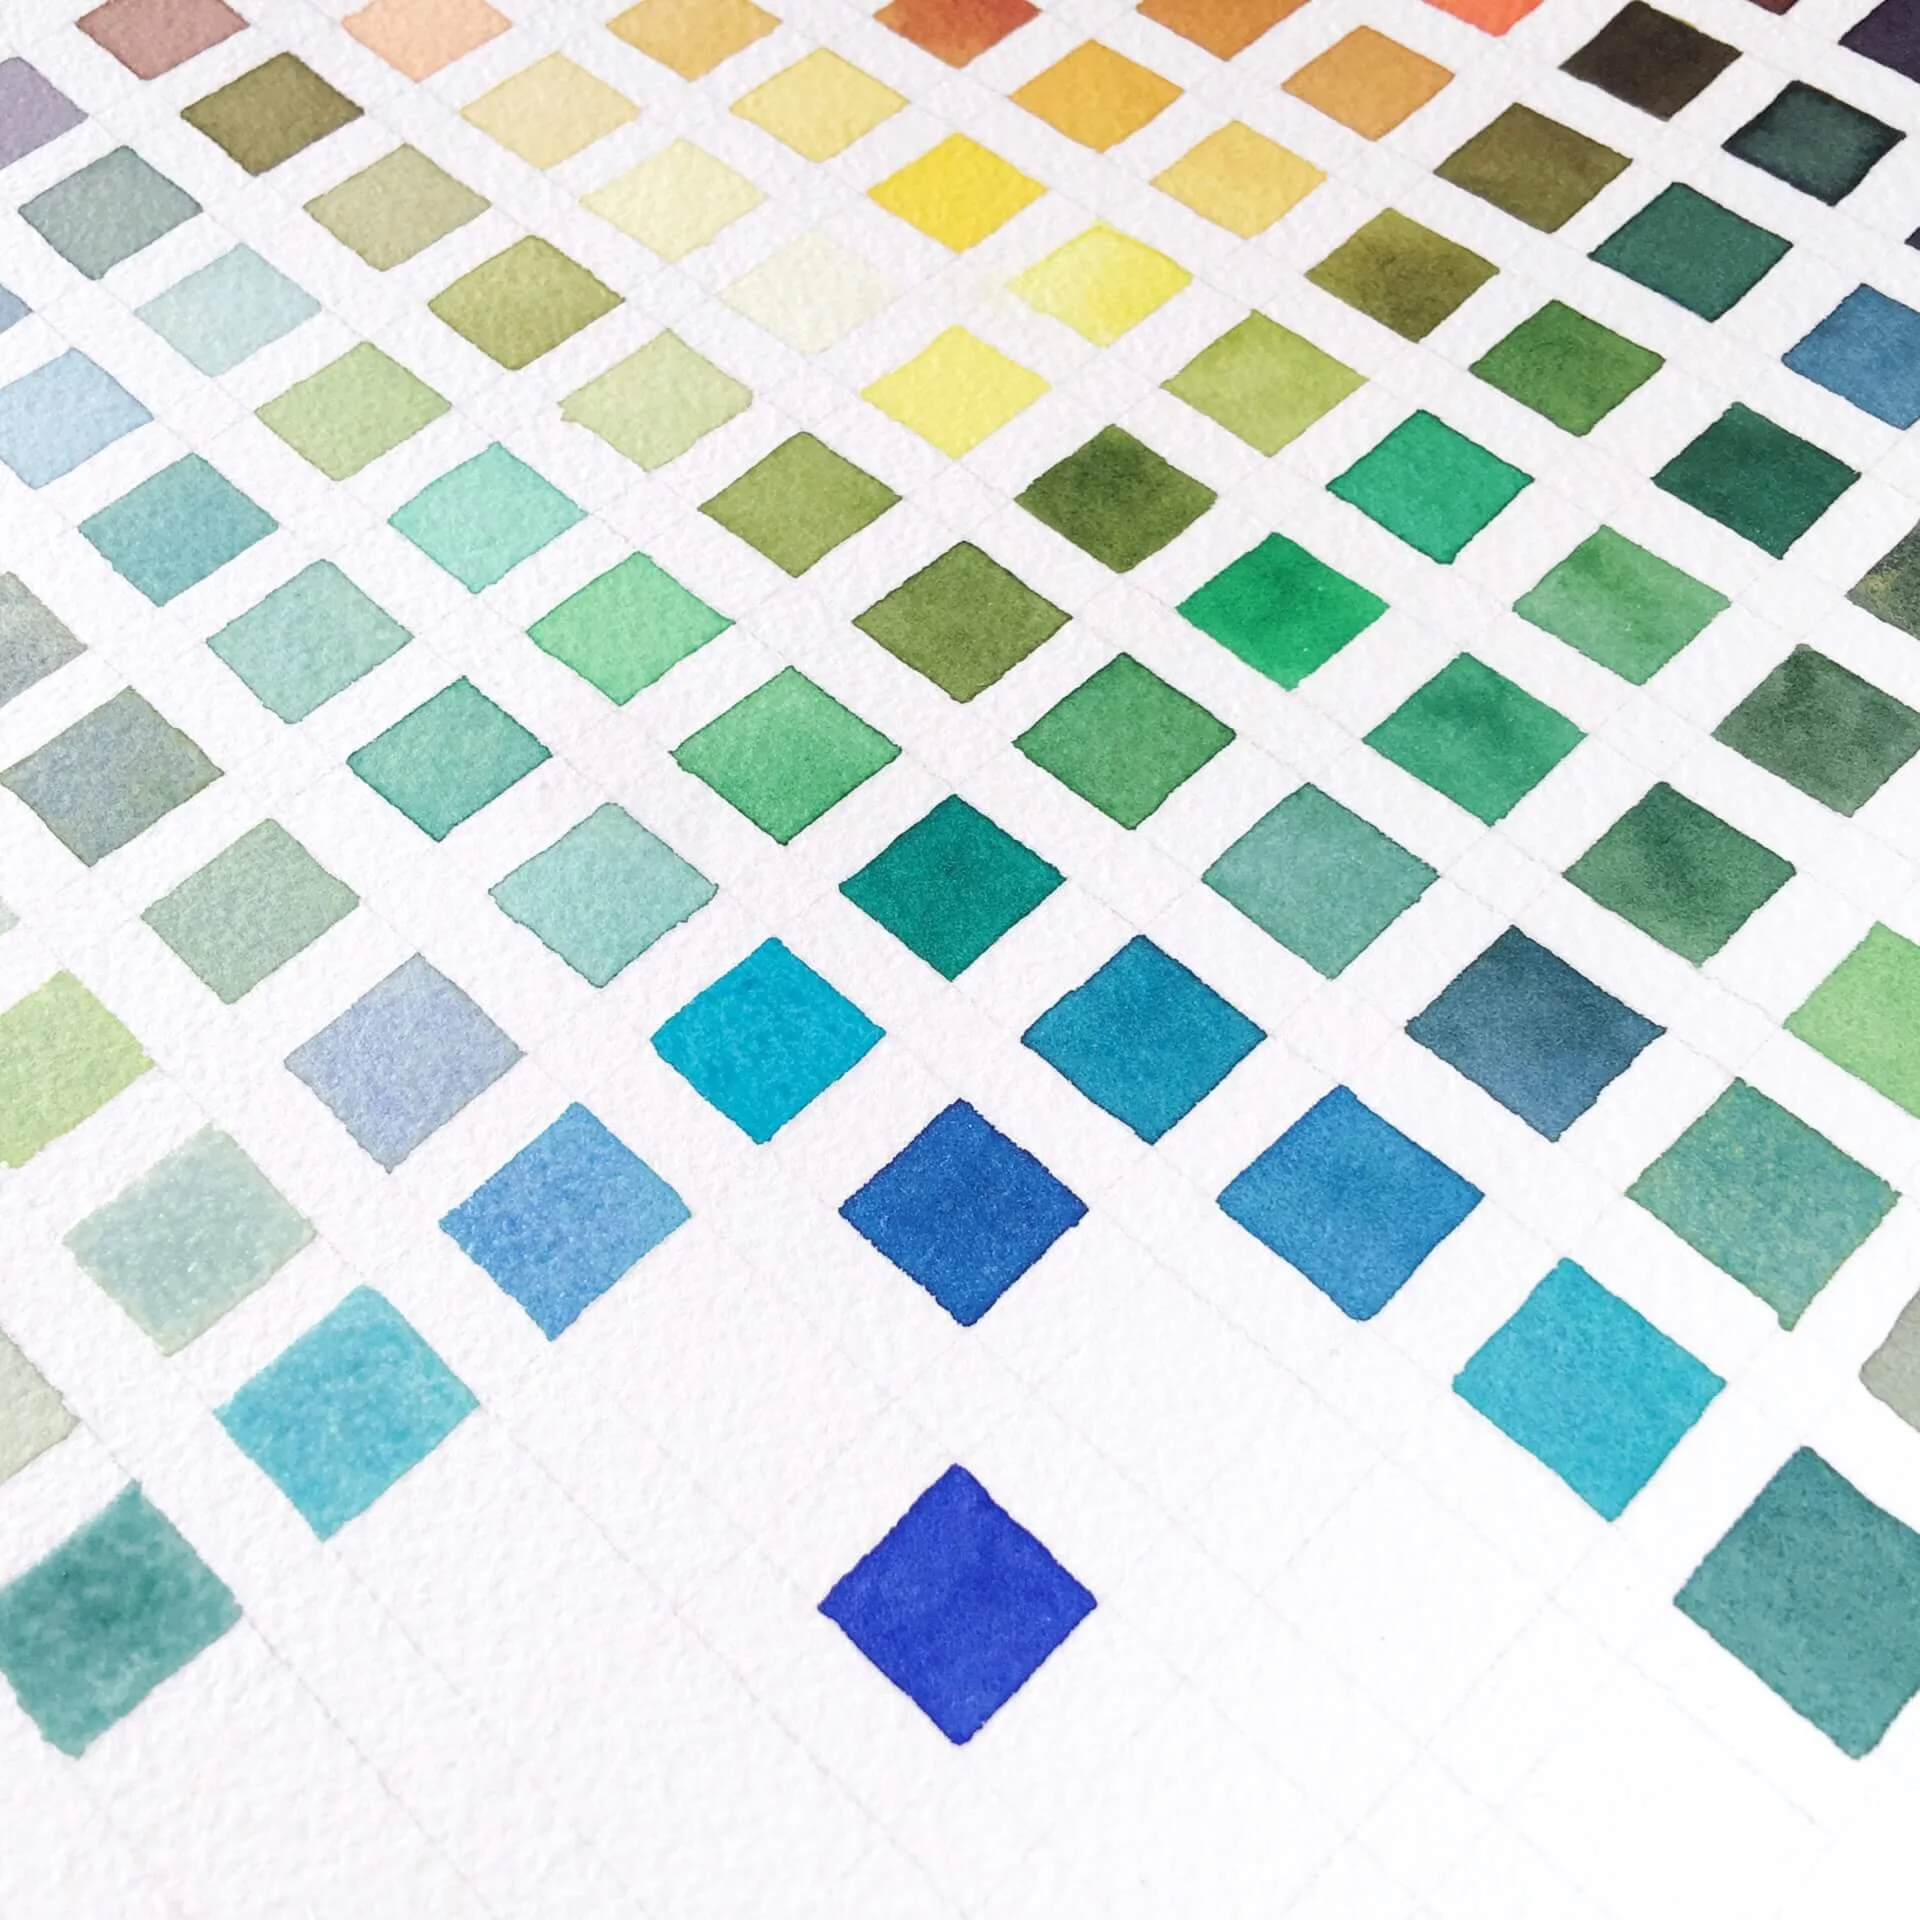
Just fill out the form below to grab a PDF containing a 36-color chart and a 144-color chart in full color with all the paint colors labeled for your reference!
FREE COLOR CHARTS
Enter your email to download a copy of my 6-color and 12-color color mixing charts that you can use for your own reference.

Thank you so much for following along with this series! Next week I’ll post the final watercolor chart, type 5! If you’ve been following along and found this helpful, let me know by liking this post or commenting below with any questions or suggestions for other things you’d like to see in the future!
If you try any of these out, please tag me @susanchiang_ on instagram so I can see them!
Thanks for reading,
Susan
